Hexagon Cardigan Crochet Pattern
- Ina
- Jan 9, 2024
- 2 min read
Updated: Sep 9
I know, there are plenty of patterns out there on how to create a hexagon cardigan - but I wanted to write up everything I used to create this funky rainbow version!
If you're new to crocheting, this is the perfect project for you to try out. It is super simple and customisable...
If you like this pattern and would like to leave a tip, you can donate or buy a pattern from here - this helps me to keep making patterns for you, thank you for your support!

WHAT I USED:
Rainbow Cotton 8/4 Color Pack 09 from Hobbii - I bought two and doubled up the yarn to make it thicker. I ended up with a lot left over from the middle colours, but needed two extra of the red - that’s four red in total.
5.5mm hook
The size of your stitches depends on the yarn weight and hook size; the above is what I used to get the size in the pictures. Each comma in the pattern instructions represents a new stitch.
Stitches (US):
Double Crochet (DC)
Chain (CH)
Slip Stitch (SLST)
ROUND 1 – CREATING A HEXAGON
Start by making a magic loop – here’s a good video tutorial of how to do it.
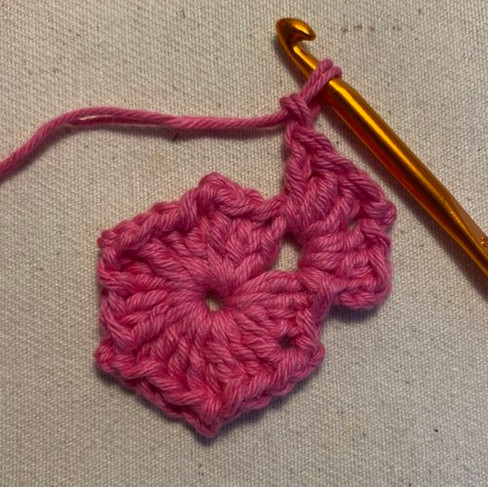
ch3 - this counts as your first dc throughout. Make 3dc in the loop, ch2. This makes one cluster.
Repeat 3dc ch2 five more times - you should have 6 clusters in total.
Pull on the short tail to close the loop and slst into your first ch3 to finish the round.
ROUND 2
slst into the next space, and (ch3, 2dc, ch2) - making your initial cluster.
3dc in the same space and ch1.
When you have two clusters separated by ch2 like this, it makes a corner space.
Add a corner space to each ch2 space in this round with a ch1 in between each. You should have 6 corner spaces (12 clusters) and 6 ch1 between them.
ROUND 3 AND ON...
The rest of the rounds continue by adding 3dc, ch1 clusters to each ch1 space, and making a corner wherever there is a corner in the previous round.
As you go you’ll notice it won’t be able to lay flat anymore, and as it gets bigger you should be able to fold it into an “L” shape. This “L” shape will form a sleeve and one half of the body of your cardigan.
Fasten off here and change to purple.
Continue making rounds, here is how many I did of each colour:
4 purple
3 dark blue
3 light blue
2 blue-green
3 green
2 light yellow
2 mustard yellow
2 orange
2 red
Keep going with the rounds until you have your desired size. I measured mine by just placing the folded “L” on myself.
Once you have one side, repeat everything and make another which you will then crochet together to end up with the cardigan.
When you finish both, lay them out in a “T” shape, and connect them down the middle, as well as down the sides of the sleeves.


